Hey there, fellow electronics enthusiast! Whether you're a DIYer, a hobbyist, or a seasoned professional, mastering the art of soldering can open up a world of possibilities. Imagine being able to repair your own gadgets, create custom electronic projects, or even build your own robots! Sounds exciting, right?
But hold on a sec – before you dive into the world of circuits and solder, you need the right tools. And that's where a circuit board soldering kit comes into play. In this guide, we'll walk you through everything you need to know about these kits, from what they are to how to choose the best one for your needs. Ready to get started? Let's go!
So, what exactly is a circuit board soldering kit? In simple terms, it's a collection of tools and materials that you need to solder electronic components onto a printed circuit board (PCB). Think of it as your electronic toolbox – it has everything you need to make those tiny connections that bring your projects to life.
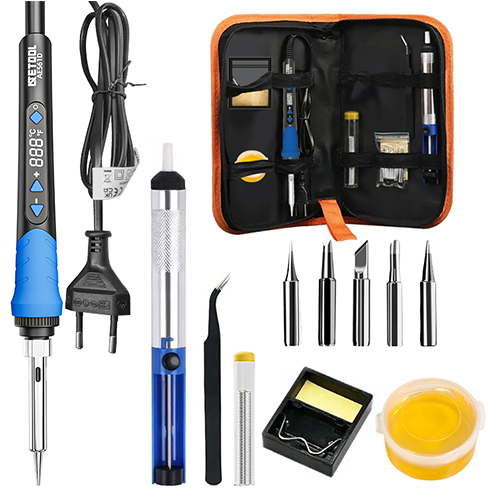
A good soldering kit typically includes a variety of tools. Let's break down some of the must-haves:
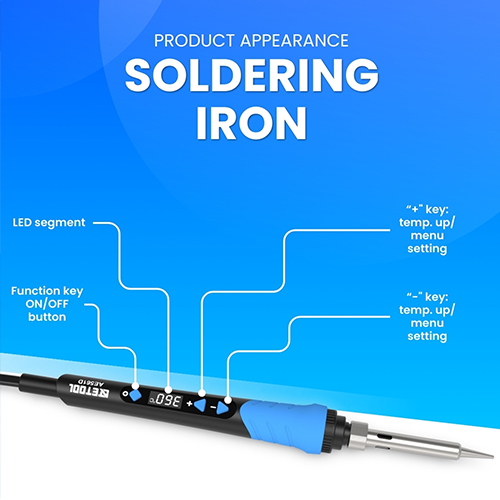
Soldering Iron: This is the heart of your kit. It's a handheld tool that heats up to melt solder, allowing you to join electronic components together. Think of it as your magic wand in the world of electronics.
Solder Wire: This is the "glue" that holds everything together. Solder is a metal alloy that melts when heated and solidifies as it cools, creating a strong electrical connection.
Soldering Stand: Safety first! A stand holds your hot soldering iron when you're not using it, preventing accidental burns or damage to your workspace.
Desoldering Pump: Made a mistake? No worries. This handy tool helps you remove solder from a joint, so you can fix errors without a hitch.
Soldering Flux: This is like a cleaning agent for your soldering process. It helps remove oxidation from the metal surfaces, ensuring a clean and strong connection.

Alright, so now you know what a circuit board soldering kit is. But why do you need one? Let's break it down:
For DIYers and Hobbyists: If you love tinkering with gadgets, a soldering kit is a must-have. It allows you to repair broken electronics, build custom projects, and bring your creative ideas to life.
For Engineering Professionals: In the world of engineering, precision is key. A high-quality soldering kit ensures you can make reliable connections, whether you're prototyping a new design or repairing a critical component.
For Students and Learners: Learning to solder is a valuable skill that can set you apart in the field of electronics. A soldering kit gives you hands-on experience, helping you understand the fundamentals of electronic circuits.
For Mechanics and Repair Centers: Speed and efficiency are crucial in repair work. A good soldering kit allows you to quickly and reliably fix electronic issues, keeping your customers happy and your business running smoothly.
Need some inspiration? Here are a few real-world applications where a soldering kit can make a difference:
Repairing a broken smartphone: Save money and learn a new skill by fixing your own devices.
Building a custom drone: Impress your friends with a homemade flying machine.
Creating wearable tech: Combine fashion and technology with your own DIY smart accessories.
Choosing the right circuit board soldering kit can feel a bit like navigating a maze. With so many options out there, how do you pick the best one for your needs? Don't worry, we've got you covered. Here's a handy guide to help you make an informed decision.
When shopping for a soldering kit, keep these key factors in mind:
Wattage: The power of your soldering iron matters. For general electronics work, a soldering iron with 20-50 watts is usually sufficient. Higher wattage irons heat up faster and maintain temperature better, which is great for more demanding tasks.
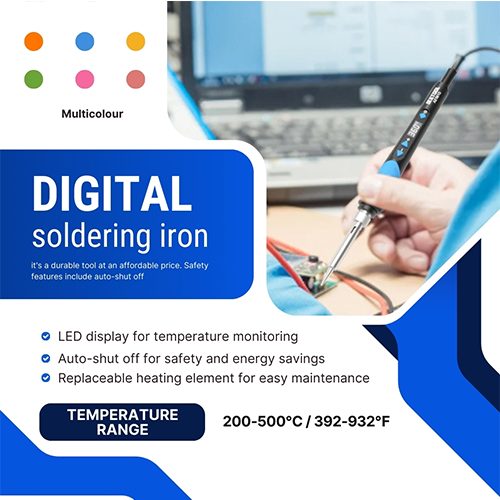
Temperature Control: This feature is a game-changer. Being able to adjust the temperature allows you to work with different types of solder and components without damaging them. Look for a kit with a temperature-controlled soldering iron for maximum versatility.
Accessories: A good kit should come with essential accessories like extra tips, a stand, a desoldering pump, and solder wire. Some kits even include advanced tools like helping hands or magnifying glasses, which can make your work easier and more precise.
For Beginners: If you're just starting out, look for a kit that's user-friendly and includes comprehensive instructions. Kits designed for beginners often come with practice projects to help you get the hang of soldering.
For Professionals: Experienced users might prefer kits with higher-end features like digital temperature displays, a wider range of tips, and advanced desoldering tools. Durability and reliability are key for professional use.
Before you buy, take some time to read reviews and do a bit of research. Look for feedback from other users, especially those with similar needs to yours. Online forums, YouTube reviews, and product comparison websites can be invaluable resources.

Alright, you've got your shiny new circuit board soldering kit. Now what? Let's walk through the basics of using it. Whether you're a total newbie or just need a refresher, these steps will help you get started.
First things first: set up your workspace. Make sure you have a clean, well-lit area to work in. Gather all your tools and materials, and keep them within easy reach. Safety is paramount, so always wear safety glasses and work in a well-ventilated area.
Setting Up Your Workspace: Find a stable surface to work on. A heat-resistant mat can protect your table from accidental burns. Keep a damp sponge or brass wool handy for cleaning your soldering iron tip.
Safety Tips and Best Practices: Always unplug your soldering iron when not in use. Be mindful of where you place the hot iron to avoid accidental burns. And remember, never touch the tip of the soldering iron – it gets extremely hot!
Ready to start soldering? Here's a step-by-step guide:
Heating the Iron and Tinning the Tip: Plug in your soldering iron and let it heat up. Once it's hot, apply a small amount of solder to the tip. This process, called tinning, helps improve heat transfer and protects the tip from oxidation.
Positioning Components and Applying Solder: Place your components on the PCB and hold them in place. Touch the tip of the soldering iron to the joint where the component lead meets the pad on the PCB. After a second or two, feed solder into the joint, allowing it to flow and create a solid connection. Remove the solder first, then the iron.
Once you're comfortable with the basics, you can explore more advanced soldering techniques:
Surface Mount Soldering: This involves soldering tiny components directly onto the surface of the PCB. It requires precision and a steady hand but allows for more compact and intricate designs.
Through-Hole Soldering: This traditional method involves inserting component leads through holes in the PCB and soldering them on the opposite side. It's great for beginners and offers strong mechanical connections.
Just like any other tool, your circuit board soldering kit needs regular maintenance to stay in top shape. Here are some tips to keep your kit working like a charm:
Cleaning and Caring for Your Tools: After each use, clean the tip of your soldering iron with a damp sponge or brass wool. This removes oxidation and ensures good heat transfer. Occasionally, you might need to replace the tip if it becomes too worn.
Storage Tips to Prolong the Life of Your Kit: Store your soldering iron in a stand when not in use. Keep your tools and accessories organized in a toolbox or dedicated storage area to prevent damage and make them easy to find.
Regular Maintenance Routines: Check your soldering iron's power cord and plug for any signs of wear or damage. Make sure the iron heats up properly and maintains a consistent temperature. If you notice any issues, address them promptly to avoid further damage.

Even with the best circuit board soldering kit, you might run into some issues. Don't worry – troubleshooting is part of the learning process. Here are some common problems and how to fix them.
A cold joint occurs when the solder doesn't melt completely, leading to weak electrical connections. This can happen if the soldering iron isn't hot enough or if you don't apply enough heat to the joint.
Solution: Ensure your soldering iron is properly heated and apply the tip to both the component lead and the pad for a few seconds before adding solder.
Bridges are unintended connections between two points on a PCB, usually caused by excess solder. They can create short circuits and cause your project to malfunction.
Solution: Use a desoldering pump or solder wick to remove excess solder. Ensure you're using the right amount of solder and a fine-tip iron for precision.
Oxidation on the soldering iron tip can prevent proper heat transfer and lead to poor solder joints. It appears as a black or dull coating on the tip.
Solution: Regularly clean the tip with a damp sponge or brass wool. If oxidation persists, you might need to re-tin the tip or replace it.
If the solder doesn't stick to the joint, it could be due to dirty surfaces or insufficient heat.
Solution: Clean the surfaces with isopropyl alcohol before soldering. Make sure your iron is hot enough and the tip is properly tinned.
By now, you should have a solid understanding of what a circuit board soldering kit is, why it's essential, and how to choose, use, and maintain one. Soldering is a skill that opens up endless possibilities in the world of electronics, from repairing gadgets to building custom projects.
Remember, practice makes perfect. Don't be discouraged by initial challenges – every mistake is a learning opportunity. With the right tools and a bit of patience, you'll soon be creating reliable, professional-quality solder joints.
Happy soldering, and may your electronic adventures be successful and fun!
For beginners, a soldering iron with adjustable temperature control and a power range of 20-50 watts is ideal. Look for a kit that includes essential accessories and detailed instructions.
Clean your soldering iron tip by wiping it on a damp sponge or brass wool while it's hot. This removes oxidation and keeps the tip in good condition. Re-tin the tip by applying a small amount of solder to it after cleaning.
Yes, lead-free solder is a safer alternative to traditional lead-based solder. It requires a slightly higher temperature to melt, so make sure your soldering iron can reach the necessary heat.
To avoid damaging components, use a temperature-controlled soldering iron and work quickly but carefully. Ensure the components are properly positioned before soldering and avoid applying excessive heat.
If you make a mistake, don't panic. Use a desoldering pump or solder wick to remove the solder and try again. Practice on scrap boards to build your confidence and skills.
Contact: Karen
Phone: (0086) 755 2340 8754 ext. 807
E-mail: atetool@atetool.com.cn
Add: 5F, 1-2# Building, Tongfuyu Industrial Zone, Aiqun Rd, Shiyan Subdistrict, Bao'an, Shenzhen, 518108, China